|
» |
|
|
|
|
|
|
|
Find unique 3D objects to scan |
|
|
|
|
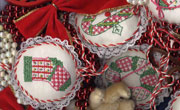
Your first step is to pull out some colorful ornaments, garland, and ribbons. You can incorporate food items, food or wine labels, poinsettia leaves, mistletoe, lace, fabric, buttons, strings of small toys....even strings of popcorn and cranberries, if you desire.
Next, arrange the items on your scanner bed. Try to cover every square inch of the scanner glass. You may notice that your scanner lid may not close on the objects. That's okay -- just cover the objects with a heavy white sheet or a cardboard box lid of appropriate size. You can also put the lid down gently as far as it will go and cover the remaining open area with a heavy white sheet.o get started, think about who will be reading your holiday newsletter. What would your friends or distant family members most like to hear about?
|
|
|
|
Add a photo to your background |
|
|
|
|
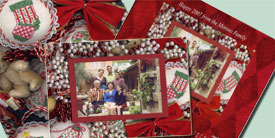
You can kick things up a notch by adding a photo to the mix.
To scan with the photo on the glass:
- Slip a printed photo face-down underneath your ornaments and baubles, then line everything up as best you can.
- Do a pre-scan.
- Check the pre-scan to see if you want to adjust the locations or alignments of the photo or any item in the layout.
|
|
Although it's easy to scan your items with the photo on the glass, you can do your scan and then add one or more photos to it using your favorite photo-editing software, such as Photoshop. You can also digitally place a photo over your scanned image in Microsoft Word. You will have a lot more control in photo placement if you use this method.
|
|
|
|
Scan your objects, then print |
|
|
|
|
Using your scanner software, do a pre-scan to how everything looks on-screen. Keep rearranging your items until you are satisfied with the pre-scan. For example, you may want to make sure all ornament hooks are facing one edge of the page (or not!).
For your final scan, set the scanning resolution to between 150 and 300 dpi. The higher the resolution, the higher the quality. At 150 dpi you can make nice prints. But at 300 dpi you can make breathtaking prints and maybe even enlarge your final image a bit.
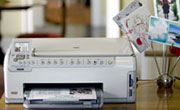
You will not only get great results if you scan using an HP Photosmart All-In-One -- you'll also be able to make an immediate print of your creation.
|
|
|
|
Tips for scanning objects |
|
|
|
|
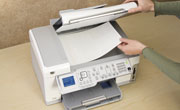
Scanner beds are only so big, and the lids can only close so far on larger items. Keep these tips in mind as you experiment with scanning objects.
The underside of the scanner lid is white. If you want a different color background, add bright fabric over your objects or place colored card stock on top of your photos.
- Gritty or crumbly items may allow dirt into the crevices of your scanner that are almost impossible to remove. Prevent particle entry by using a sheet of transparency paper that is larger than the gritty item, on the scanner glass. Still use common sense and caution with such items.
- Dust off tapestry items and wipe hard-finish items before placing on the scanner glass. Why scan dusty items? Clean ones look better, and they'll keep your scanner glass cleaner too.
- When layering objects for a jam-packed arrangement, try placing larger objects first and filling in the gaps with smaller items. This way all items can be visible in the end. • During this process, try not to leave fingerprints on the scanner glass that you'll just have to clean off later. Lift flat items off the glass with a piece of card stock or craft knife (carefully!).
- Don't forget to use your pre-scan feature. Then you can rearrange your objects until you're satisfied before waiting for a full scan.
- Experiment with printing on different types of papers. For a durable, lovely, and long-lasting printed piece of art, use HP's Premium Plus Photo Paper and Vivera inks in your HP Photosmart All-in-One printer.
Now that you've seen how scanning 3D objects can create a rich background for a photo, you're sure to discover other ways to incorporate scans of 3D objects into your holiday cards, labels, gift tags, and more.
|
|
|
|
|
|
|
|
|
|
|
|