Windows® 7 Tip 4: Jump to your favorite items
PC Learning Center
Explore
Create
Support & Drivers

Introduction
Quickly jump to the items you use the most—including documents, photos and websites—in two easy clicks. An upgrade to standard jump lists that keep your most recently viewed items handy for fast access, Windows 7 Jump Lists take convenience to the next level.
More tips
Tip 2: Get Faster Help Desk Answers ›
Tip 3: Easily Manage Open Windows ›
Tip 4: Jump To Your Favorite Item ›
Tip 5: Control your PC with your voice ›
Tip 7: Access your favorite programs in 1 click ›
Tip 8: Easily transfer files & settings to your new PC ›
Tip 9: Turn up your music enjoyment ›
Tip 10: Personalize your desktop ›
How it works
In addition to giving you quick access to recently opened items, Windows 7 Jump Lists let you pin your favorite apps and files to the same list, so you can access everything you use most—all from one place.
Jump Lists are organized by the program used to open or create the file, and can easily be accessed through the taskbar and Start menu.
Using Jump Lists on the taskbar
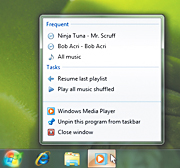
Quickly and easily open a favorite item from your Jump List, no matter how many files you’ve opened since.
- From the taskbar, right-click on the program you used to open or create the file you’re looking for. Hover over it to see the list of recently opened items.
- Choose your desired file from the recently opened items in the Jump List, click the pushpin icon, and click Pin to this list.
- To unpin an item from a Jump List, click the pushpin icon, then click Unpin from this list.
Taskbar Jump List tips
- Pin shortcuts—Drag a shortcut from the Start menu or desktop to the taskbar to pin that item to the Jump List.
- Working with folders—Folders are considered Windows Explorer items and will appear in the Windows Explorer Jump List when pinned or opened.
Using Jump Lists on the Start menu
It’s easy to pin an item to a jump list on the Start menu.
- Go to the Start menu and open the program’s Jump List.
- Point to the desired item in the Jump List, click the pushpin icon, and then click Pin to this list.
- To unpin an item from the Jump List, simply click Unpin from this list.